
Whenever we talk about the Exchange server, we know that it is one of the most renowned mail servers designed by Microsoft. It helps the user to save the Microsoft Outlook data in the OST format. The Exchange Server allows the user to make an exact copy of the data or we can say a replica of the exchange mailbox. In this blog, we will discuss step by step guide to import OST to Office 365.
Microsoft Office 365 is one of the well-known and popular cloud services. Through the use of this, we can easily access MS Word, Excel, Outlook, Powerpoint, etc. You must have an exchange platform like Office 365 cloud as it is directly accessible from all over the world.
In addition, there are many Exchange users who love to keep a copy of Exchange mailboxes on Office 365 and it is also easy to import files from OST in the offline mode. Therefore, there are both manuals as well as professional solutions for importing OST files to Microsoft 365 instantly. Let’s discuss.
Need to Import OST to Office 365
- It is easy to access the data in the Office 365 Account even after you accidentally deleted the data.
- Office 365 works as an Exchange platform that always stores the duplicate copy of the data.
- We can access the data in Office 365 from any location.
- The data we store in the Office 365 account is completely secure and cannot be accessed by any other person as it has a full robust-security measure like Two-factor Authentication.
- MS Word, Outlook, Excel, all these apps have already been included in this and we don’t need to take care of any other installation as the upgrades will happen automatically.
Manual Method to Import OST files to Office 365
In the manual method, there are basically two steps. In the first step, you will convert OST files to PST. And in the second step, you will import the PST file to your Microsoft 365 account.
Step1: Convert OST files to PST
In this method, we will directly use the Outlook account and create a new PST file and copy all the OST items in that.
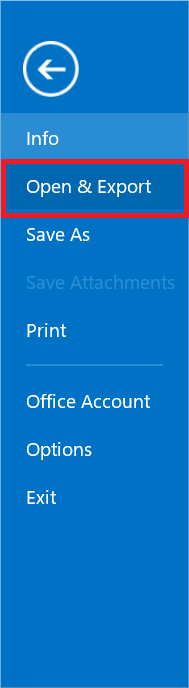
- Firstly, start the Microsoft Outlook application on your system. Click on File option>> Open & Export option.
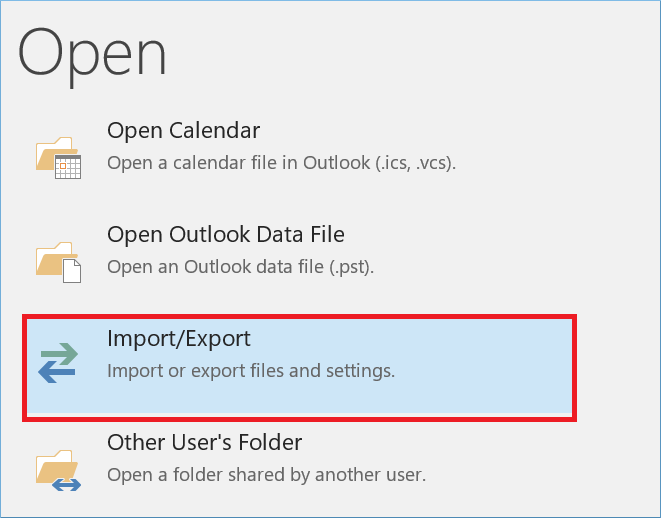
- Click on Import/Export option.
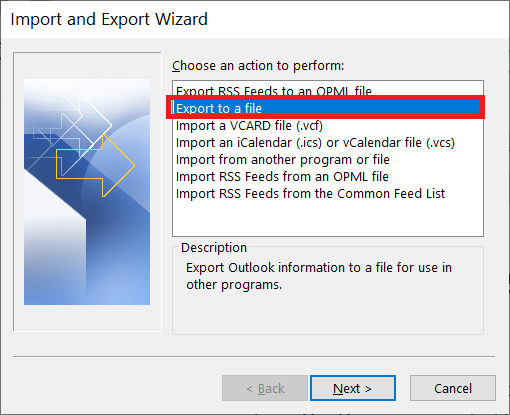
- Choose Export to a file and click on Next.
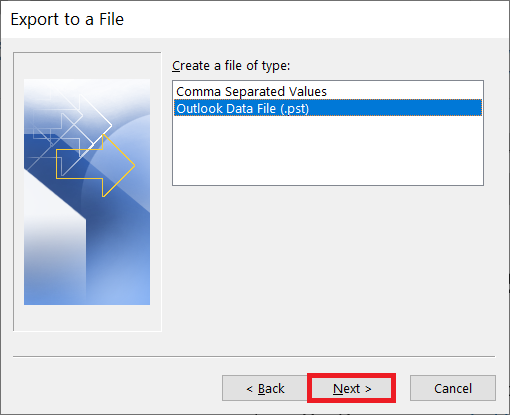
- Select Outlook Data file(.pst file) and click on Next.
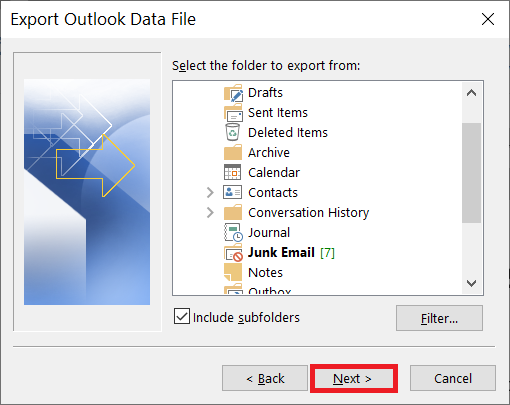
- Choose files, and folders that you want to import into a pst file, and Next.
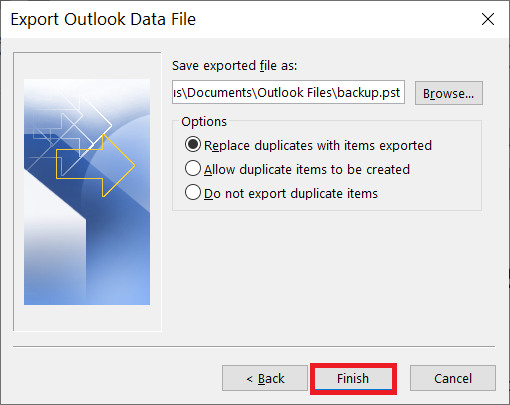
- Enter the desired location in the browse box and click on replace duplicate items and click on Next to export the PST file.
Step2 Import the resultant file to Office 365
In this method, we will convert the Newly created Outlook Data file to Office 365 Account without the use of any external utility. You can directly upload the file using Azure AzCopy.
- Download and Install the Azure AzCopy on your system and copy the SAS URL.
- Then upload the file to Office 365.
- Create the mapping file (CSV file).
- Create an import job in Office 365 to import PST files.
- Filter the data and initiate the import job.
Limitations of Manual Solution:
- In the manual method, you need to put more of your valuable time and effort.
- If the PST file size is more than 20GB then it creates a disruption.
- It is not guaranteed that you will get all the selected data.
- The manual method requires much technical knowledge as compared to the professional method.
Therefore, the manual method is also simple and easy to use and users can easily convert OST files to Office 365 Accounts.
But if you will face any issues or any errors, then you can continue with our professional solution and easily do OST to Microsoft 365 Migration.
Professional Method to Import OST to Office 365
There is an instant and one of the most productive solutions which allow users to easily import OST files to Office 365 Accounts. The solution includes a Software PCDOTS OST Converter which enables users to import the files. This utility is easy to use and can be easily used by all users. It has the ability to import not only single but multiple files without imposing any kind of size restrictions and with no loss of data.
This mentioned tool also supports multiple other formats to import the data instantly without imposing any kind of size limitations. And, users can easily work according to their needs and requirements. Just Download the mentioned OST to the Office 365 Migration tool for free of cost and start the process.

Steps to Import OST Files to Office 365:
- Run the Migration tool in your existing Windows OS system to initiate the conversion process.

- Click on Open Menu >> Choose Email data Files >> Upload OST files directly from your system.

- Then, you will be able to see the complete data display preview on the screen. Select the required OST files that you want to import.

- Then, click on the Export option and choose Office 365 Account as an Email Service.

- Then, fill up the correct login credentials of your Office 365 account.

- After that, you will be able to see the resultant data in that particular location and you can see the successfully prompted message on the screen.

Hence, by performing these simple steps, users can easily import OST files in bulk directly to Office 365 account.
Features of OST to Office 365 Migration Tool
- It is easy to import single as well as multiple files within a single attempt. The user can easily continue with the free downloaded version of OST to the Microsoft 365 Migration tool and can import 10 files at a time. And, if the user wants to import more than 10, multiple, or even unlimited files then continue with the premium version.
- The Migration tool provides the user option to choose between files and folders. Basically, choosing files can upload a particular file, and choosing folders can upload multiple files present in a single folder.
- Also, it will display the complete data preview of OST Files before the migration process so that the user can select or deselect the files according to his/her choice. This is one of the most liked features by the users as they can work better with this.
- In addition, users can easily save the resultant data in the desired location. Also performing multiple operations will save users most of the time and valuable effort.
Conclusion
Hence, we will understand two different solutions for importing OST to Office 365 Accounts. The manual solution is good to use but it has many limitations. But if we talk about the professional method, it will work faster and save most of the valuable time and effort. Now, it’s your choice to go with any solution that you find easy. But I suggest you go with the mentioned migration tool as it is one of the easiest and most simple solutions available on the Internet.


